


In this blog, we'll integrate a GraphQL API into our React app. For testing purposes, I have developed and deployed a public GraphQL API. This API will allow us to perform CRUD operations on Post. You can access the playground at [this url] (graphql-dummy-api.herokuapp.com/graphql) and refer to the DOCS and SCHEMA. You can refer to the code from this repo.
We have our GraphQL API, so let us integrate it into our React app. There is more than one way to integrate GraphQL API to the front end, like using GraphQL clients. But I'll be using a library called Urql instead of any other GraphQL client.
There are mainly 3 reasons for me using it:
- It is lightweight, powerful, and easy to use.
- It is extensible i.e. it allows you to change how you fetch, cache, or subscribe to the data.
- Also, my favorite, it enables us to use GraphQL in our app without much complex configuration.
So, navigate to the root directory of our React App and add urql to our app by writing the following command.
yarn add urql graphql
As we have added the urql package to our web app, we need to configure it. For that create a new file namely createUrqlClient.ts. In that create a urql client and provide the URL of the API as an argument and export this client as shown below.
import { createClient } from "urql";

export const createUrqlClient = createClient({
  url: 'https://graphql-dummy-api.herokuapp.com/graphql'
})
Now, to use this client, we need to wrap our <App /> in _app.tsx using the Provider of urql and pass the client as a prop to this provider. You can refer to the _app.tsx from here.
import type { AppProps } from 'next/app';
import { Provider } from 'urql';
import { createUrqlClient } from '../createUrqlClient';

function MyApp({ Component, pageProps }: AppProps) {
  return (
    <Provider value={createUrqlClient}>
        <Component {...pageProps} />
    </Provider>
  );
}
export default MyApp;
We are done configuring our Urql client, now let's query our API.
We can query our GraphQL API, as specified in the Urql docs as well. But instead of querying this way, I would prefer using GraphQL Code Generator.
GraphQL Code Generator is a CLI tool that can generate TypeScript typings out of the GraphQL schema. It analyzes the schema, parses it, and outputs code at a wide variety of formats, based on predefined plugins and user-defined ones. We just need to provide our GraphQL API URL, and it will generate all the types.
So, let's add this Code Generator to our app by running the below script.
yarn add graphql
yarn add -D @graphql-codegen/cli
For generating the types, we need to add a typescript plugin by running the below command.
yarn add -D @graphql-codegen/typescript
Now as we have used Urql along with the typescript, we also need to add the TypeScript Urql plugin by running the below code.
yarn add -D @graphql-codegen/typescript-urql
We have added all the necessary plugins of code generator, now let's initiate it in our project by running the script below.
yarn graphql-codegen init
After running the above command, it will prompt us with the type of application where we'll select React tech stack as shown below.

After that, we need to enter the URL of our GraphQL API.

Select the following settings when prompted.
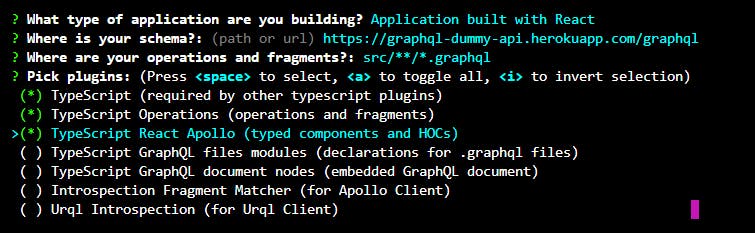
Having introspection selected to no and naming the script as gen continues with the defaults as shown below.
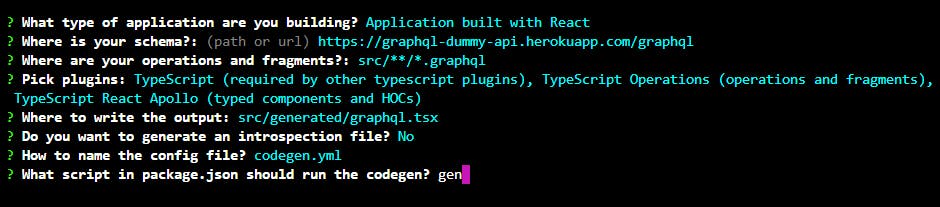
This will create a codegen.yml which will display all the plugins. Also, we can see that a gen script has been added to our package.json.
Now, before generating the types, we need to write the graphql queries and mutations. So let's write a simple query to fetch all the posts in our src/graphql/query/getPosts.graphql file.
query Posts($limit: Int!, $cursor: String) {
  posts(cursor: $cursor, limit: $limit) {
    hasMore
    posts {
      id
      title
      text
    }
  }
}
Similarly, let's write mutations to perform create, update and delete to Posts. In /graphql/mutations/createPost.graphql, lets write mutation to create Post.
mutation CreatePost($input: PostInput!) {
  createPost(input: $input) {
    id
    createdAt
    updatedAt
    title
    text
  }
}
Similarly, for updating Post in /graphql/mutations/updatePost.graphql file.
mutation UpdatePost($id: Int!, $title: String!, $text: String!) {
  updatePost(id: $id, title: $title, text: $text) {
    id
    text
    title
    textSnippet
  }
}
For deleting Post in /graphql/mutations/deletePost.graphql file.
mutation DeletePost($id: Int!) {
  deletePost(id: $id)
}
Navigate to the codegem.yml file in your root and update its content as below.
overwrite: true
schema: "https://graphql-dummy-api.herokuapp.com/graphql"
documents: "graphql/**/*.graphql"
generates:
  generated/graphql.tsx:
    plugins:
      - "typescript"
      - "typescript-operations"
      - "typescript-urql"
We have all the queries and mutations ready, lets generate the typescript types for our Graphql schema by running the command yarn gen in our root directory. This will generate a new file generated/graphql.tsx containing all the types of our Graphql schema.
As we have generated the types of our query using codegen, let us fetch all posts. In index.tsx, copy the below code. You can refer index.tsx from here
const [{ data, error }] = usePostsQuery({
    variables: {
      limit: 10,
    },
  });
Make sure that usePostsQuery is imported from the generated/graphql.tsx file. In this, we need to pass arguments as an object in variables.
We got all the Posts in this data variable. So let's render it in our frontend. You can find the Post component here.
Let's mutate our post's data. In the provided Post component, I have added the Update-post and Delete-post buttons, so let's add the onClick handler to both the buttons and the logic to it.
For the Delete Post, copy the below code.
const [, deletePost] = useDeletePostMutation();

  const onDeletePost = async () => {
    setLoading(true);
    await deletePost({ id });
    router.reload()
    setLoading(false);
  };
Similarly, let's add click handler to Update Post. You can refer to the UpdatePost Component here. In the onClick handler add the update-post logic from below.
 const [, updatePost] = useUpdatePostMutation()

  const updatePostClicked = async () => {
    setLoading(true);
    await updatePost({
      id: +postId!,
      text,
      title
    })
    setLoading(false);
    router.push('/');
  };
Make sure useUpdatePostMutation() and useDeletePostMutation() are imported from /src/generated/graphql.tsx.
All these CRUD operations can be done using other libraries too but using the correct combination of packages makes our task a lot easier and as we can notice using codegen has made our task quite easy.