In the previous blog, we discussed writing a Smart Contract using Solidity and interacting with it using Remix IDE. Now, we'll deploy our Lottery contract wrote in previous blog.
Note: You can refer this repo to follow along.
Initialize an empty react project namely Lottery-Contract using the following script.
npx create-react-app lottery-contract
You can add Typescript support to your project by following the steps mentioned here.
Inside lottery-contract directory, create a directory namely contracts. In contracts directory, create new file namely Lottery.sol.
Copy the Smart contract from the Remix IDE and paste it in the Lottery.sol file.
Previously in Remix, we tested our Smart Contract by deploying it locally. Now, to interact with our Contract from the frontend, we need to deploy it to a public blockchain network i.e. Rinkeby Test Network.
For deploying a Contract to a public network, we first need to have the Metamask extension installed. If you don't have Metamask, you can install it from here and Sign in. While signing in, you will be prompted to copy the Backup Phrase. Copy that Backup Phrase and save it for future reference. After signing in, get some free ethers from public faucets.
Now, to deploy our contract we first need to compile our Solidity Contract.
To deploy our Contract, we need to add Solidity compiler to our project by running the following command. We also need fs (file-system) module for reading the files, along with the Solidity compiler.
npm i fs-extra solc
In the project directory, create a compile.js file, for writing the logic to compile our Solidity contract.
Navigate to the compile.js file and paste the following code.
const path = require("path");
const fs = require("fs");
const solc = require("solc");

const lotteryPath = path.resolve(__dirname, "contracts", "Lottery.sol");
const source = fs.readFileSync(lotteryPath, "utf8");
In the source variable, we have stored Solidity Contract by reading the Contract using fs and path module (path is a native js library).
Now, we have to compile this contract and export it. For that, paste the code from below in the compile.js file.
module.exports = solc.compile(source, 1).contracts[":Lottery"];
Above, we have used solc.compile() which compiles our Solidity Contract and returns interface and bytecode, which we will use to deploy our Contract on Rinkeby Test Network.
You can see the compiled Contract by logging the output from solc.compile() in the console.
Now, in the root directory, create a deploy.js file, which will contain our deployment logic.
To deploy our contract, we need to add 2 libraries i.e. truffle-hdwallet-provider and web3. For that, run the following code in the root directory.
npm i truffle-hdwallet-provider web3
We have added the library packages required to deploy our Contract. But apart from the libraries, we'll need to access a Blockchain node to deploy our contract on a live public network. This node will be provided by infura to us.
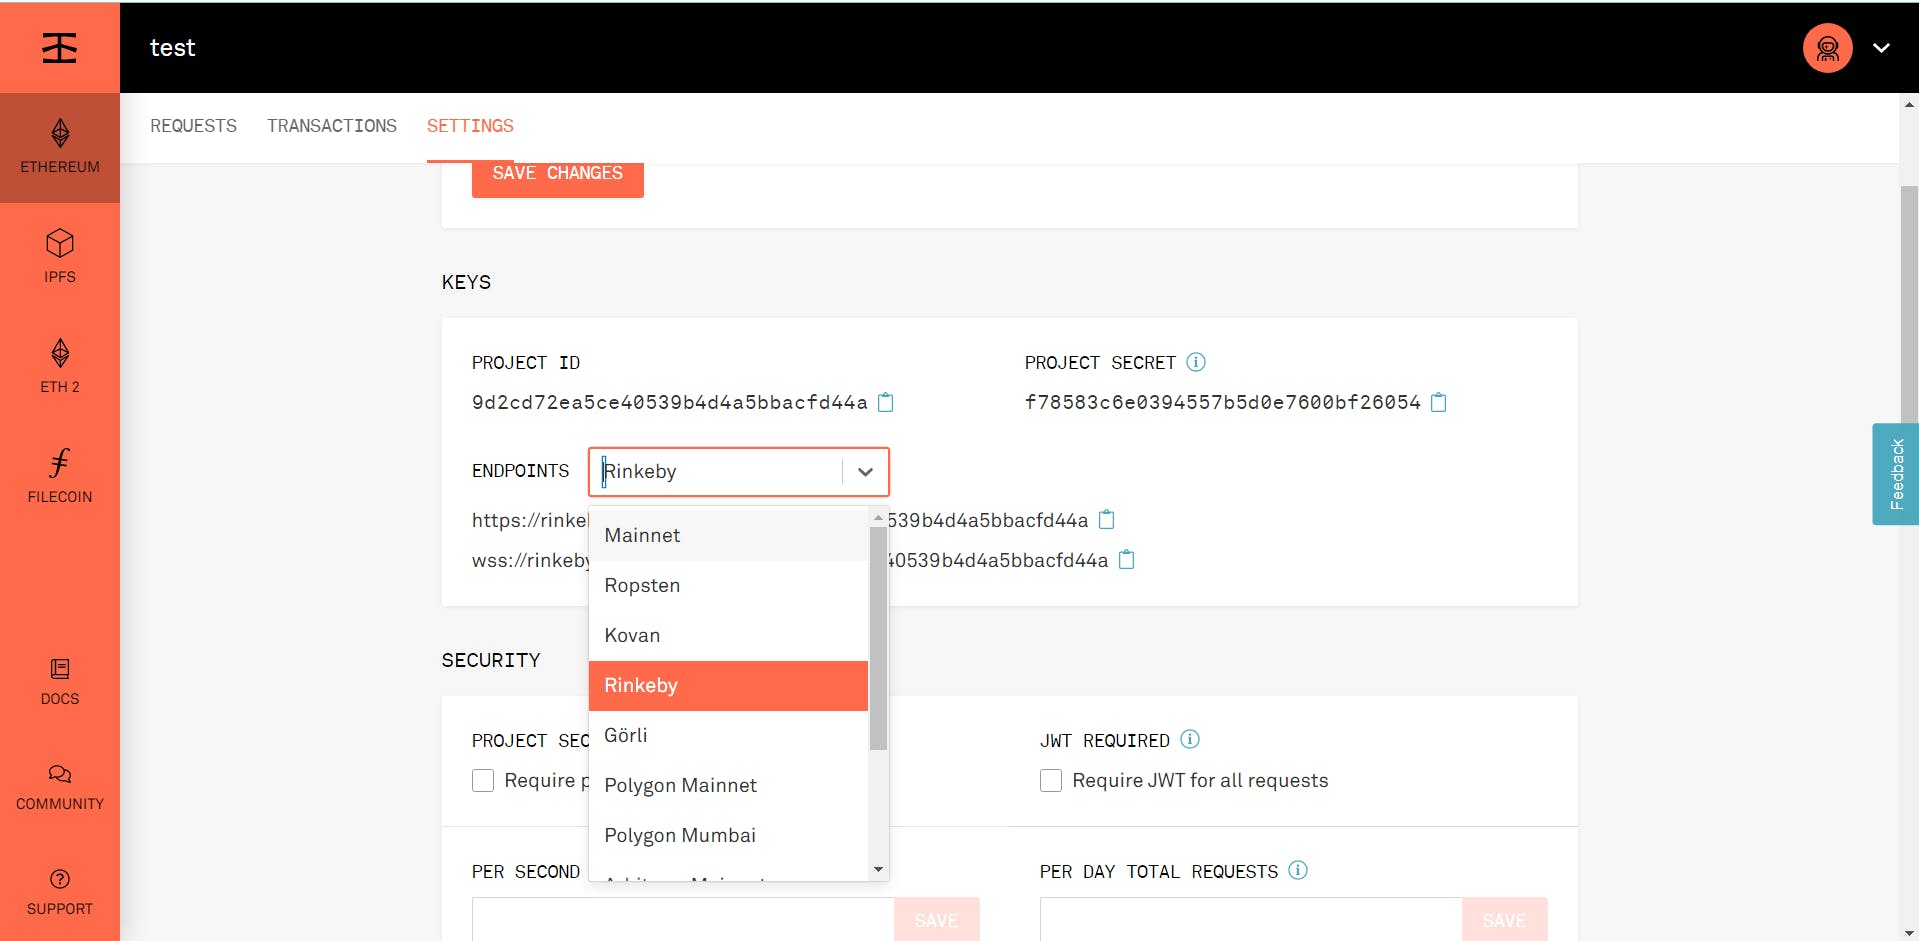
To get access to node for our project, singup on infura.io and navigate to Ethereum tab on the left Navbar. Under the Ethereum tab, click on Create New Project for creating a new project.
After creating new project, under the KEYS section, expand the ENDPOINTS and select Rinkeby as shown below.

Selecting the Rinkeby network will change the 2 URLs displayed below the ENDPOINTS dropdown. Copy the second URL from the two and save it, as we'll use it after some time to deploy our Contract.
Navigate back to the deploy.js file in our project and paste the code from below.
const HDWalletProvider = require('truffle-hdwallet-provider');
const Web3 = require('web3');

// Getting the output of our compiled Solidity Contract
const { interface, bytecode } = require('./compile');
To deploy a Contract to Rinkeby, we first need to set up a wallet provider to connect our Infura node with our Metamask wallet. For that, copy the below code and paste in the deploy.js file.
const provider = new HDWalletProvider(
  // `$YOUR_METAMASK_RECOVERY_CODE`,
  // `$RINKEBY_INFURA_API`
);
Replace $YOUR_METAMASK_RECOVERY_CODE and $RINKEBY_INFURA_API with your Metamask recovery phrase and your Infura API respectively.
For interacting with the BlockChain Network and deploying our Contract, we are going to use web3. To initialize an instance of web3 paste the below code in the deploy.js file.
const web3 = new Web3(provider);
While creating an instance of web3, we are providing provider as an argument to Web3() function. Note, that we have configured our provider with our Metamask's recovery phrase and Infura URL. Due to this, our Contract will get deployed using Ethers from our Metamask wallet and our Infura Node URL.
Finally, let's move to our deploy function. For that, paste the below code to the deploy.js file.
const deploy = async () => {
  // getting accounts from our Metamask wallet
  const accounts = await web3.eth.getAccounts();

  console.log('Attempting to deploy from account', accounts[0]);

  // deploying our contract
  const result = await new web3.eth.Contract(JSON.parse(interface))
    .deploy({ data: bytecode })
    .send({ gas: '1000000', from: accounts[0] });

  console.log(interface)
  console.log('Contract deployed to', result.options.address);
};
deploy();
Let's discuss our deploy function. Firstly, we have fetched the accounts connected to our Metamask wallet.
Now, each Metamask wallet comprises of 12 Ethereum wallets. Thus web3.eth.getAccounts() will return an array comprising of 12 wallet addresses.
Among these 12 addresses, we'll deploy from our first account. Thus, we have used accounts[0] for deploying our contract.
Following that, we have declared a result variable.
In that, we have stored the returned data from our deployed Contract.
To deploy our Contract, we need to call new web3.eth.Contract(JSON.parse(interface)) and in the .Contract() method, we need to provide our Contract's instance in JSON form as an argument.
Following the .Contract(), we have called .deploy({ data: bytecode}) and .send({ gas: '1000000', from: accounts[0] }) methods respectively.
.deploy() function will take bytecode of our contract as an argument and .send() function will take gas value and account address as an argument.
gas is the amount of ether we need to send along with the deployment of our Contract and its unit is Wei.
Note: Gas value won't get stored as a Contract Ether's on the Rinkeby Network.
from attribute specifies the account from which we want to deploy our contract.
Now run node deploy.js in the terminal.
After a successful deployment of the Contract, interface and Address of the Contract will be logged in the console. Copy both the values and keep them for future reference.
We have completed the deployment, now let's head on to the frontend interaction.
For that, we need to create a local instance of our contract, using our Contract's interface and blockchain Address on which our Contract is deployed.
For that, in the src folder, create an empty web3.js file. In that file, copy the below code.
import Web3 from 'web3';
window.ethereum.enable();

const web3 = new Web3(window.web3.currentProvider);

export default web3;
In the web3 configuration, we have used window.web3.currentProvider as a provider which uses the provider from the Metamask extension in the browser.
But before using the Metamask provider, we need to enable it by writing window.ethereum.enable();. This will allow us to use the Metamask provider in our browser.
Now, let's create a local instance of our Contract using the Configuration of web3 we just configured above.
Create an empty lottery.ts file and copy the code from below.
import web3 from './web3';

const address = /* Your Contract's address */;

const abi = [
 //  Your Contract's abi code
];

// @ts-ignore
export default new web3.eth.Contract(abi, address);
Now, get your Contract's abi and address which we logged in the terminal while deploying our Contract. Using both the values, export a new instance of web3.
Finally, let's interact with our contract. Head on to the App.tsx file in the src folder. Declare 3 variables shown below and Copy the useEffect() function into the App.tsx.
  const [manager, setManager] = useState('');
  const [players, setPlayers] = useState([]);
  const [contractBalance, setContractBalance] = useState('');
  const [value, setValue] = useState('');
  const [message, setMessage] = useState('');

   useEffect(() => {
    const init = async () => {
      const manager = await lottery.methods.manager().call();
      const players = await lottery.methods.getPlayers().call();
      const balance = await web3.eth.getBalance(lottery.options.address);

      setManager(manager);
      setPlayers(players);
      setContractBalance(balance);
    };
    init();
  }, []);
For using the instance of our locally deployed Lottery Contract, we need to import it. Thus, copy the import statements from below to App.tsx file.
import React, { useEffect, useState } from 'react';
import lottery from './lottery';
In the useEffect(), we are fetching the manager of the Contract by calling await lottery.methods.manager().call() method. Similarly, we can get players in the Contract by calling .getPlayers().call() method.
But, for getting the balance of the Contract, we need to call web3.eth.getBalance(lottery.options.address);. This function will use an instance of web3 and get the balance at the specified address.
These all functions will return Promise. Thus, we need to make this function asynchronous. After fetching all the values, update their respective states.
Following, in the src create an App.css file. In App.css add the code from below.
.App {
  text-align: center;
}

.App-logo {
  height: 40vmin;
  pointer-events: none;
}

@media (prefers-reduced-motion: no-preference) {
  .App-logo {
    animation: App-logo-spin infinite 20s linear;
  }
}

.App-header {
  background-color: #282c34;
  min-height: 100vh;
  display: flex;
  flex-direction: column;
  align-items: center;
  justify-content: center;
  font-size: calc(10px + 2vmin);
  color: white;
}

.App-link {
  color: #61dafb;
}

@keyframes App-logo-spin {
  from {
    transform: rotate(0deg);
  }
  to {
    transform: rotate(360deg);
  }
}
Import this css in the App.js file using the following import statement.
import './App.css';
Add the following code in the return statement of App.tsx.
return (
    <div>
      <h2>Lottery Contract</h2>
      <p>This contract is managed by {manager}</p>
      <p>
        There are currently {players.length} entered, competing to win{' '}
        {web3.utils.fromWei(contractBalance, 'ether')} ether!
      </p>
      <hr />
      <form onSubmit={submitForm}>
        <h4>Want to try your luck?</h4>
        <div>
          <label>Amount of ether to enter</label>
          <input
            style={{ marginLeft: '1vw' }}
            value={value}
            onChange={(e) => setValue(e.target.value)}
          />
          <button style={{ display: 'block', marginTop: '1vh' }}>Enter</button>
        </div>
      </form>

      <hr />

      <div>
        <h4>Ready to pick a winner?</h4>
        <button onClick={onPickWinner}>Pick a winner!</button>
      </div>
      <hr />
      <h1>{message}</h1>
    </div>
  );
In the above return statement, it is clear that we are displaying the Contract's data and providing a form to enter the Contract.
But, for our Frontend to get functional, we need to define submitForm and onPickWinner functions. So let's define it.
const submitForm = async (e: any) => {
    e.preventDefault();

    const accounts = await web3.eth.getAccounts();
    setMessage('Waiting on transaction success...');
    await lottery.methods.enter().send({
      from: accounts[0],
      value: web3.utils.toWei(value, 'ether'),
    });
    setMessage('You have been entered!');
  };
In the submitForm() function, we are initially fetching the accounts. Following that, we are calling lottery.methods.enter().send() method to enter the lottery.
Note: Here, we need to call the .send() method as we are creating a transaction on the blockchain network and also need to specify the account from which we want to make a transaction. Also, making a transaction on the blockchain network requires some amount of fee as a gas value and its unit is Wei.
Now, declare PickWinner() function as below.
 const onPickWinner = async () => {
    const accounts = await web3.eth.getAccounts();

    setMessage('Waiting on transaction success...');

    await lottery.methods.pickWinner().send({
      from: accounts[0],
    });

    setMessage('A winner has been picked!');
  };
Remember, we have allowed only the manager of the contract to pick a winner. Thus, calling pickWinner function from accounts other than the manager's account will throw an error. Also sending a transaction on the blockchain will take about 15 - 20 s to get executed.
Congratulations! You have successfully developed your first Dapp.
